
If you’ve ever tried to print a booklet of slides from PowerPoint you’ll know how poor the built-in options are.
But why do we want to make a slidebook at all when everyone is so concerned about sustainability and minimising carbon footprint? Every decision needs to be considered and our view is that having a physical booklet of slides to make notes on and to refer back is hugely valuable.
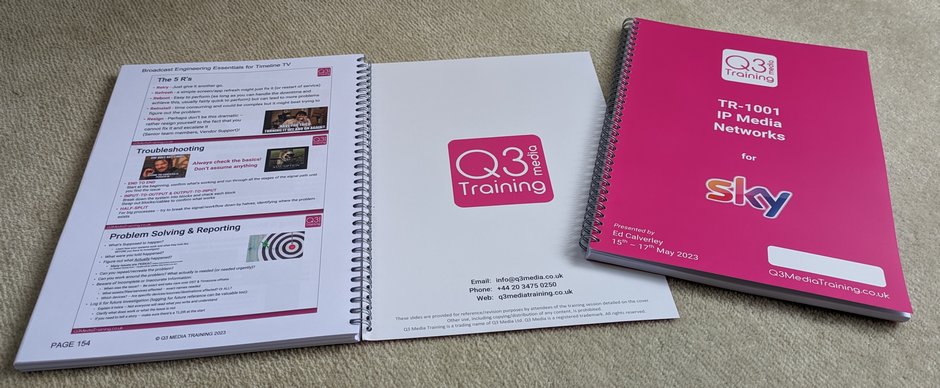
Those who know me won’t be surprised to hear I own a wire-binding machine – alongside a decent laminator it’s a great addition to every office!
I still sometimes print and bind myself but more commonly we now use a local printer as they can make 300gsm covers with full-bleed pink and matt lamination which makes the overall result feel great. We’ve worked with them to find some great 100gsm paper that’s super-smooth (making it as thin as 80gsm), but gives a great finish and makes the slides look sharp and vivid on the page!

I attended a training course years ago on some new codec, I’ve often wanted to re-visit the content years later but sadly have ZERO record of what was covered. Yes, I made some paper notes but they’ve long since disappeared. The training provider DID give me an electronic copy of the slides, but it used some software protection requiring me to install some software to view it – and that was only valid for one machine. So of course I’ve long-since lost access. On most courses, we provide unprotected PDFs of all our training slides – yes it puts our content at risk of being copied, but the real value is in the delivery!
I still have many folders of printed handouts from my BBC Engineering Training days at Wood Norton (as both a trainee and a lecturer!) and knowing I can dip into them at any time is reassuring and has been useful a few times over my 25 years in broadcast. When I started running training courses I committed to providing printed notes and sure enough I get many positive comments many years later from people who treasure their Pink Book of Slides!
So how do I make something worth printing that people will actually want to keep hold of? It’s been a struggle and I’ll share my secrets here! First I’ll tell you what not to do (I did it for a couple of years!)…
The Early Years – PNG Export
(a lot of effort for a fundamentally flawed result)
Dismissing PowerPoint’s built-in options quickly, I initially tried exporting each slide as a PNG and compiling into a separate documents using Word.
This worked well and was my standard workflow for a couple of years.
Exporting all slides to PNG is actually really simple in PowerPoint but by default they are NOT usable for printing. In order to get high-res PNGs to be exported you have to change a key in the Windows Registry (easy enough to find via Google).
My early attempts had 4 slides to each page, printed in landscape. This was a bit too small to read some text and isn’t nice for people to use as you can’t simple turn the pages like a book.
3 slides per page is the sweet-spot. In the very early days I used to crop the bottom of each PNG file (easy with Irfanview’s batch processor!). I told myself this was to allow the slides to be bigger on the page but in reality it was to remove all the bits of solid pink that would just be a waste of my toner (I used to print them all on my own printer!).
Importing hundreds of PNGs into word makes for a lot of work so it’s important they are the correct size. By reducing the margins in your document before importing you can make sure the imported files are appropriately sized. But I’d then have to click on each one and add a mid-grey border. That’s a lot of clicking. Tip: Pressing F4 in MS Office repeats the last formatting action.
This method of printing PNGs had some benefits, especially as you could chop slides up and/or add additional text into the word document.

But it has a major downside – Quality.
This wasn’t an issue when I printed directly from Word, but once we started working with an independent printer wehad to pass artwork to them as a PDF.
Despite having high-res PNGs and printing to PDF using a good program that actually allows you to tweak quality settings, images are still compressed using JPEG inside the PDF. This results in slight blockiness associated with DCT compression (come on a course to learn why!), and no matter how good the printer, the text just wasn’t as sharp as it should be.
The Enlightenment –
Maintain vectors all the way to print!
How to maintain vectors all the way from PowerPoint through to the final PDF – the answer was pretty obvious and when I figured it out I was so frustrated with myself for not thinking of it earlier.
Here are my steps to make beautiful slidebooks!
Each slidebook consists of 3 separate PDFs which have been merged into 1:
- Covers
The first and last 2 pages in final artwork pdf – Made in Visio (overkill but it’s what I know!) with full-bleed pink on outside covers! - Contents Page –
Page 3 in final artwork pdf (sometimes has to slip over onto Page 2 as well for long courses).
Made in Word (sometimes with assistance of Excel where it’s easier to manipulate table formatting before pasting into word). - Slide Pages –
The bulk of the pages – and where the clever bit comes…

Here are my steps to make beautiful slidebooks!
- Make a copy of the PowerPoint once ready for printing.
- ‘Remove All Sections’ in the slide organiser to all slides flow together.
- Switch to slide sorter view and re-size program window so slides can be viewed 3-per row.
- Work tough slides and delete as needed to get appropriate pagination. I strive for new section headings to be the first slide of a new page – not always possible! Sometimes you have to make new slides combining 2 sparsely populated ones into single slide to avoid page count spiralling out of control!
- ‘Save As’, choose PDF format, click ‘options’ and tick the option to ‘Frame Slides’. Then save to a file.
Unlike PRINTING to a pdf which will result in slides being on an A4 page, the Save-As function creates pages that the exact aspect ratio of your slides with no additional white margins. - Now comes the clever bit (If I do say so myself!) – Open the PDF and print it to a PDF printer set to print 3 pages per page (“xxx_3Up.pdf”).
It may take some tweaking to get the margins correct but once done it’s fast.
I use PDF24 as my printer as it has the best options to maximise quality (and is free). The PDFG printer built into Windows like to compress things too much!. This is the one place where I have to give in and use Adobe PDF Viewer. I normally use FoxitPDF Viewer but it doesn’t pass-through embeded fonts as vectors and resulted in ‘Type 3 fonts’ in the output which one printing company refused to work with as they ‘couldn’t guarantee quality’ (may contain bitmap/rasterised characters). Using Adobe viewer solved this, though it does take longer and result in larger file-size. - Add/Overlay page numbers to the 3-up file.
I use ‘I Love PDF Pro’ for this, facing pages option set to ensure numbering alternates between left/right position. Save output as “xxx_3-Up_Numbered”. - Open the resulting file to see the page numbers for each section an add these to the Content Page document. Once done print the Contents as a single Page PDF.
- Merge the Covers, Contents and Slides into a single PDF. It’s important the final page count is even otherwise the back cover won’t work – so ensure the slide pdf is an ODD number or add a single blank page into the merge.
And that’s it! Foxit PDF Viewer has a viewing mode option to show pages side-by-side but staggered so page 1 is separate. I always use this to eyeball the front an back covers and generally check everything looks ok before sending it to be printed. A typical 110 page file will be ~100MB so too big to email, I share normally via Google Drive.
Of course we still do have to revert to Word for some training courses where PowerPoint slides aren’t the main content. For example, out AutoCAD for Broadcasters source requires much more in-depth explanation of programme functions. We still get these printed externally though as we just love the pink covers!
