
Online Training Setup
I posted a photo of my setup for online training recently on LinkedIn and it had an amazing response. Many people were keen to learn more about the setup so here are some details and experiences of performing online training.
Before COVID-19 I hadn’t ever held any formal training sessions online – The closest I’d come was presenting online software demonstrations to potential customers in my former life in Product Management. In that case it’s the software that mattered (i.e. the shared screen) – effective online training however requires a little more thought.
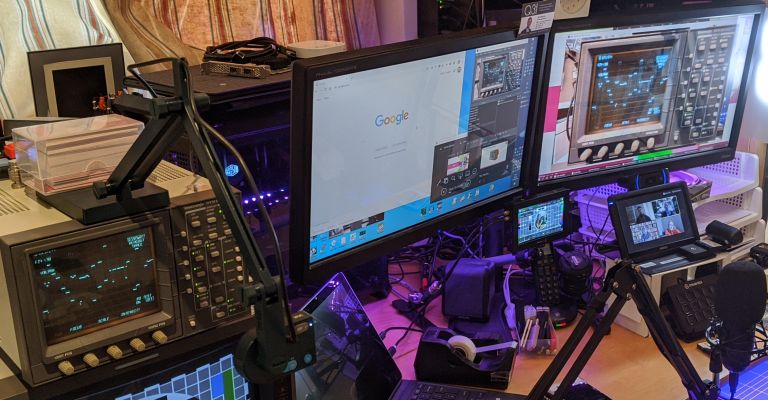
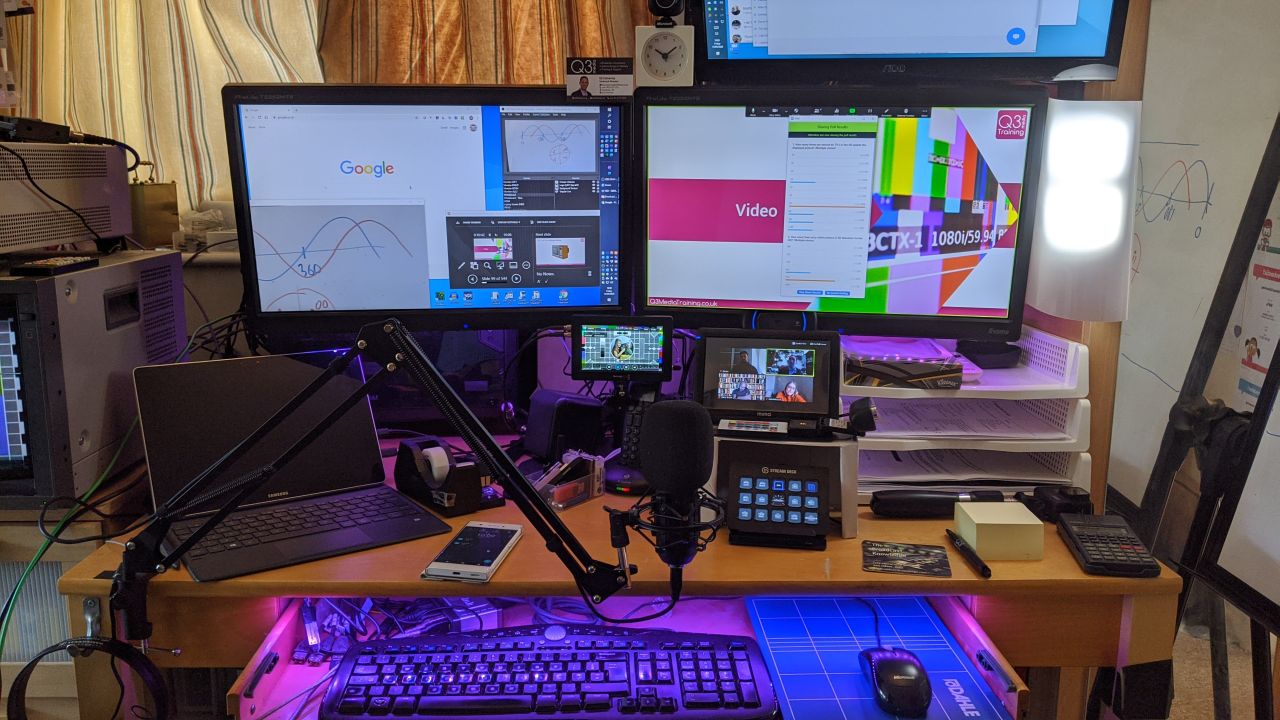
You can see a clean photo without the labels at the bottom of this post.
Main Camera Setup
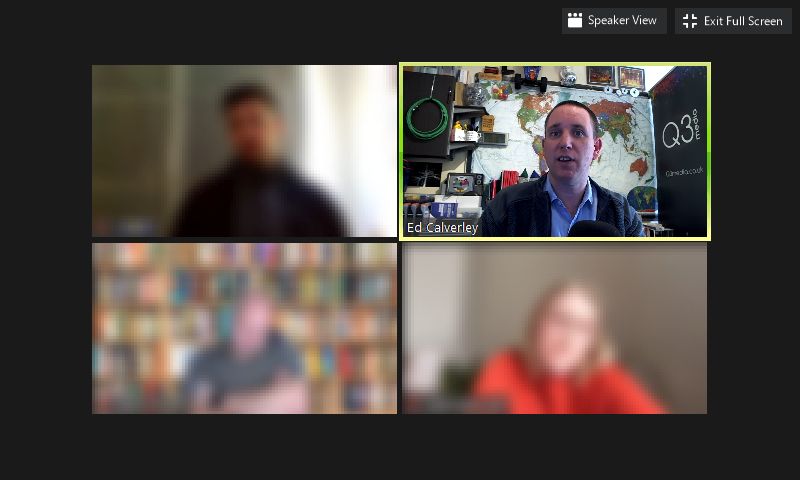
Personal contact is essential in training so having a good camera set-up and encouraging attendees to keep their camera on is essential. I use a Logitech C915 webcam for my main camera. To get the best pictures I’ve mounted a couple of cheap LED lights to the side of my main monitor and have wired their power supply so it can be easily switched on/off from my desk. I experimented with a variety of camera positions and settled for placement below my main monitor. I had an old USB mini monitor which I’ve placed directly below the camera and using the dual-screen mode on Zoom I get a separate window showing all the camera feeds so I can keep an eye on attendees during the session. It’s important to get the camera lens close to the centre of your eye-line (for the best look I know I should look directly into the lens but I’ve not managed to train myself into this habit yet!).
I’ve seen many reports from YouTuber/VLoggers recommending using a digital camera with a decent lens and HDMI output connected via a capture card to get higher quality pictures. I’ve experimented with this concept using my GoPro Hero 7 but when used with Zoom the gains are minimal (the picture form the Logitech C915 is pretty good – It’s modern version the C920 is the camera of choice for many people streaming online). I also found the bulkiness of a proper camera (even something as small as a GoPro) makes it harder to keep it close to my eye-line weakening the personal connection to the people being trained.
Elgato Stream Deck
This was a bit of a frivolous purchase which I’ve wanted an excuse to buy for ages. The Stream Deck is great piece of kit which can be used to trigger a range of things on your PC. It has specific integration with OBS Studio to allow switching between different presets with the press of a button. It can also be used to quickly mute the mic if you need to cough – it also integrates with VB-Audio Potato which I use for managing audio mixing on my machine.
I use VB Audio Potato to generate the mic mix I feed into zoom to give me full control of what audio is sent to zoom, e.g. to hear audio from a YouTube clip. Zoom has the option to share your audio when you share the screen so this should be adequate for most people. However if you are into audio I’d recommend checking this out as well as their other tools.

Microphone
Before COVID-19 I would always use the built-in microphone on my Logitech C915 webcam – which is pretty good for a webcam.
As I’d be expecting people to pay attention to me for long periods of time I wanted my audio to be as good as possible.
I already have a decent condenser microphone which I’ve used in the past when doing screen recording for e-learning. It requires phantom power though so woul dhave to be set-up to connect through my external audio mixer. I have a Behringer XENYX QX1002USB which includes USB interface but overall I thought it wouldn’t be practical to leave set-up.
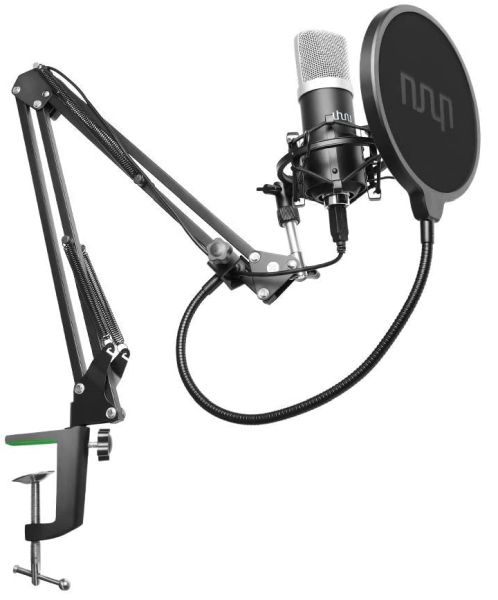
I therefore purchased a USB podcaster mic. It’s nothing special but was a compromise of price and Amazon reviews! When compared directly it sounds a lot better than the webcam and I’d highly recommend anyone embarking on a similar venture to invest. It cost £54, and that included the mounting arm (I don’t use the pop-filter).
Why Zoom?
I’m all for using free software and services but Zoom is worth every penny! I experimented with a few platforms – most have free trials (GoToMeeting, Join.Me etc) sending links to friends and family to see how easy it is to connect. Zoom is by far the easiest and generally ‘just works’. The biggest factor in using Zoom is that attendees do not need to have an account with the service in order to connect – if you dig through the advanced settings you can also set it to show the ‘Join from Browser’ link right from the start – very useful if users may be on work machines which don’t have the permissions to install software.
OBS Studio
If you have’t heard of OBS Studio and you work with video or are involved in media then I highly recommend giving it a try. It’s open source software which, once you figured it out, can perform clean switching between video sources as well as the ability to manipulate video and add composite effects in real-time. Early-on in my experimentation in what could be done with OBS, specifically thinking about online training, By using the Virtual Camera Plugin for OBS the output mix can be passed to Zoom/Skype just like any other webcam. Initially I experimented with switching between my camera, PowerPoint slides and a combination of the two where I overlayed my camera over the slides – whist this was all very clever it compromised the quality of the slides (compression not optimised for it) and frankly it was overly complicated.
In my final set-up my main camera (Webcam) is fed to zoom directly (Note: You can;t share webcams in windows so if it’s configured to be a source in OBS you can’t use if in zoom). OBS is therefor only being used to switch between OTHER sources which I might want to show during my sessions.
NDI Monitor
NDI is a proprietary protocol developed by NewTek for passing video and audio sources between systems connected via Ethernet – it’s a full eco system which continues to impress me the more I learn about it. The NDI Tools can be used for free and include the ability to capture your screen, generate test signals and display any NDI source in a window using the NDI Studio Monitor program.
There is an OBS Plugin which adds support for NDI Input and Output, with this I’m able to display the output mix from OBS in a resalable window. I use this primarily to display my whiteboard but also have another camera that I can switch to for looking at other demo bits. When I want to use it I simply drag it into view and when finished drag it back over onto my left monitor (which isn’t shared).
I’ve been impressed with Microsoft Teams, which I use with one of my clients, but to use it you have to sign in with a Microsoft account. So it’s great to use inside a business but not for my use-case where I want to be able to invite people from outside my organisation and have them connect easily. I dismissed Skype from the start for the same reason (and frankly Skype’s UI/UX is rubbish).
Once a training session has started, my main screen permanently shared – switching between PowerPoint Slides, Whiteboard or Other demo bits as needed. When we take a break, everyone simply mutes their mics and turns off their video (I set the screen to black by pressing ‘B’ in PowerPoint).
Duration & Breaks
Our initial online sessions were originally intended to be a 4-day face-to-face course. We agreed with our client to trial the online training format and tweak as needed based on feedback. We decided to schedule session in the afternoon from 14:00 to 17:30. On the first day we tried scheduling predictable 5 minute breaks at the top of each hour – it was clear 5 minutes isn’t long enough to both make a cup off tea and to visit the facilities so the second day we tweaked and have settled on having two 10 minute breaks – after a few sessions I’ve now set my reminder alarms for 15:10 and 16:20). We’ve kept the sessions at 3.5 hours total as general feedback was that this was about right. Nobody was keen to do a full day.
PDF of Slides
When we do face-to-face training we always provide printed and bound copies of all the slides as well as PDF copies. With online training we decided NOT to share PDF slides in advance but instead send to everyone immediately after the session. Firstly, having a PDF, particularity where people were connecting from machines with only one screen (e.g. laptops – which is most common, particularly during COVID-19), would have been a distraction and could take attendees away from observing the Zoom meeting. It’s also been really nice for a change to not have trainees know what things are about to be revealed on a PowerPoint slide.
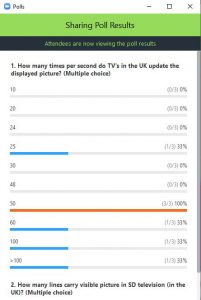
Zoom Polls
Because trainees don’t have full visibility of what’s coming in the slide deck, it’s a great opportunity to try out some new things. Zoom allows simple Polls to be created in advance (via their website). Answers can be anonymous and use questions with up to 10 answers with single or multiple responses. I used Polls on some of the initial sessions to check peoples base-level understanding of the topics being covered. Wrong answers (and there were some!) are great to stimulate conversation and the Polling in general is a great way to make people feel a bit more connected.
Note: Regardless of the fact you have you screen shared, the default behaviour is Zoom windows are invisible (i.e. don’t appear on the shared screen and are not visible to trainees). You can see answers as people enter them but you have to close the poll and select to ‘Share Results’ before others will see what you can see. Remember to ‘Hide Results’ when you’re done too – if you just close the window you can see it doesn’t close what meeting attendees are seeing.
Whiteboard
Whiteboards are essential – I was quite worried when first contemplating doing online training as I feared I wouldn’t be able to go off on tangents and/or help explain concepts with some quickly scribbled drawings.
Thankfully, despite the fact the lock-down had caused a run on Webcams, I was able to buy a cheap HD webcam from Amazon (£43 isn’t that cheap but that was the cheapest I could find!). The picture is pretty good and it can deliver 1920×1080 @ 25/30 fps so is exactly what I wanted. It’s really wide angle but I’d prefer it that way as I can zoom using OBS anyway.
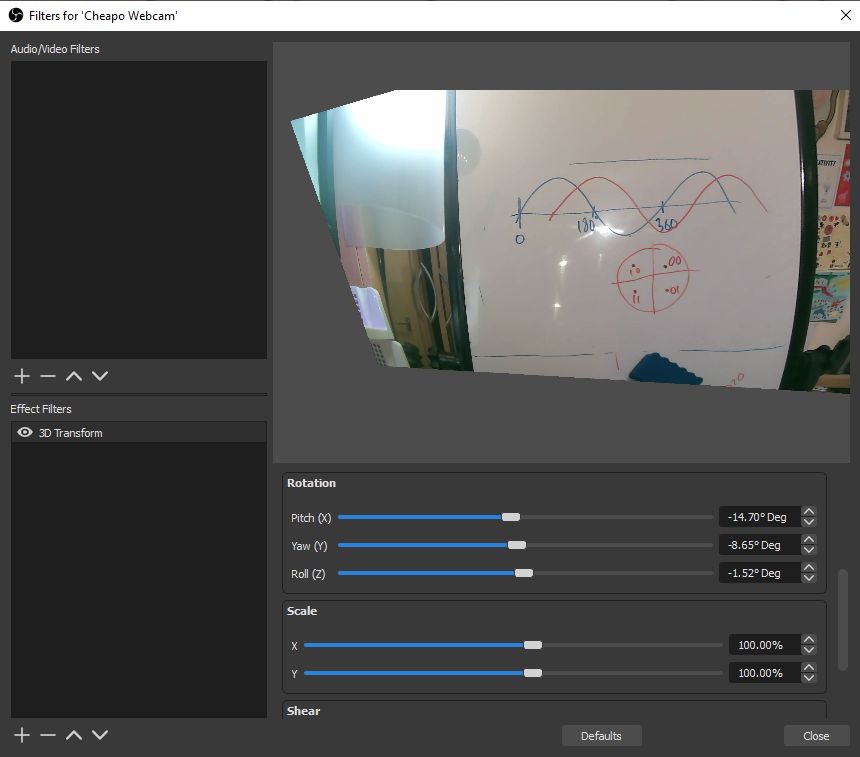
I’ve mounted the camera on the cardboard box I’d fashioned to sit the mini monitor on (in which my Stream Deck also shelters). It’s only ~50cm from the whiteboard but the wide angle lens easily captures everything. If I used the video from the camera as-is it would look awful. Using the StreamFX Plugin for OBS I’m able to add a filter to the webcam video which performs a 3D transform to correct for the offset angle.
After drawing some horizontal & vertical lines on the whiteboard and some perseverance with tweaking the values I was able to get everything pretty straight. Then in the OBS scene you can crop the edges to zoom in on the main area (TIP: hold ALT while you drag the object handles to apply crop rather than resize). I’ve left a couple of horizontal lines on the whiteboard to remind of the upper and lower limits that are visible on the camera.
As discussed above – when I want to use the whiteboard I just quickly drag the NDI Monitor window into view – it works really well!
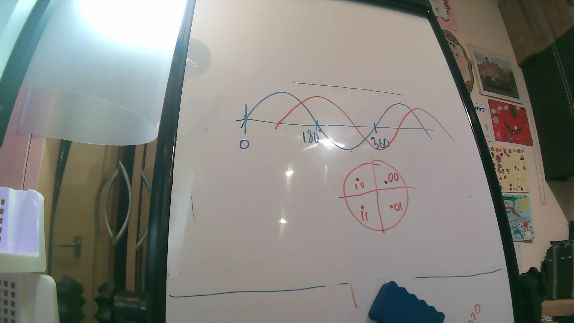
Original/Full Camera Feed
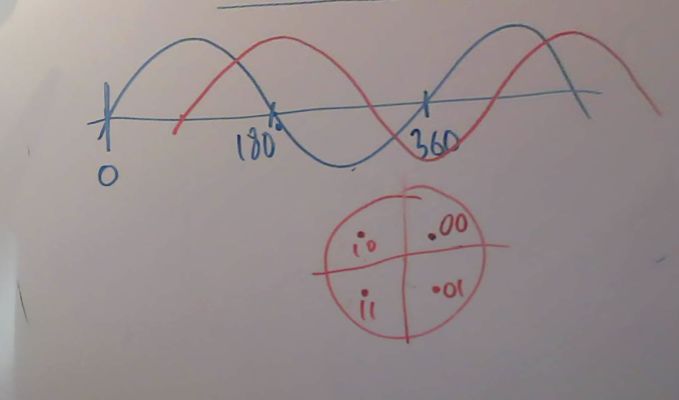
Corrected/Cropped Camera Feed
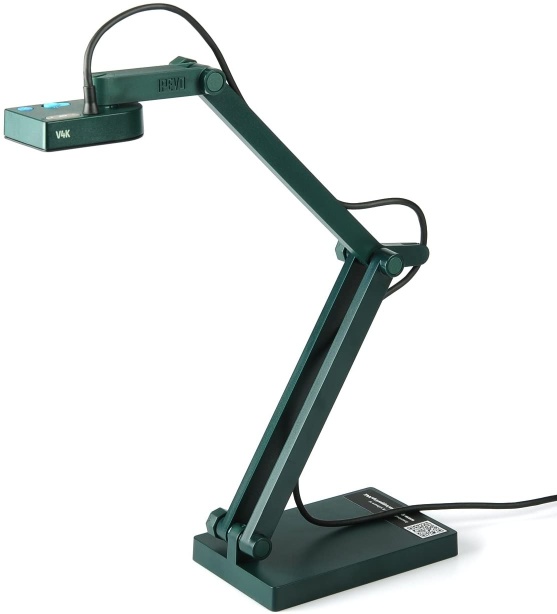
Demo Equipment via Document Camera
When training on video fundamentals/systems I like to show a waveform monitor and CRT display – My idea was to have another camera that I could point at this equipment and then switch to show it just like for the whiteboard. Thanks to the shortage of webcams I widened the net in my search and came across this listing on Amazon for a IPEVO V4K Document Camera which is mounted on an articulating arm with a weighted base.
It was plug-and play straight into OBS and gives a great result. I also used it in my session on Audio to look at a spectrum analyser I have on an android tablet – the result was almost as good as if it had been a native windows application!
Have a Backup Plan!
I have an addition screen above my main set-up which my laptop is connected to. I set this up with its own webcam (sat on top of the clock so it’s near my eye-line when looking up at that monitor).
In advance I’ve had this connected to my phone’s WiFi hotspot as I was paranoid my broadband might fail. Sure enough it did fail once – this was thankfully during a break so I was able to Connect Zoom via this and continue the training (albeit without access to the Whiteboard).
Within 5 minutes my Broadband had reconnected and I was able to switch back to the main set-up (taking care to avoid feedback when both systems were temporarily connected).
Always have a backup plan!
Other Bits?
I have a USB3 HDMI capture device – it’s not the best so I won;t link to the specific model (the video is fine but audio is noisy), I originally used it to capture the screen output of my laptop before I realised this could be done just as well using the NDI scan converter application. I’ve also experimented with using it to capture other sources but it’s not actively being used in my training setup.
My set-up also includes a couple of old BlackMagic Decklink cards in my PC – Use one in SD mode that I link up to the Waveform monitor and CRT screen. I have small cheap-Chinese media player which has both analogue and HDMI (576i/50) outputs which I convert to SDI to feed as a second source to the waveform monitor . This allows me to look at Composite, Component and SDI all in the same set-up. I also connect up all the external reference inputs using the analogue output of the media player and depending whether it’s connected or not tot he DeckLink card I’m able to show how synchronous and non-synchronous feeds look on the WFM.
The other DeckLink card runs in HD mode connected to a 5″ BlackMagic VideoAssist (record & playback), you may have spotted mounted under my monitors on an adjustable arm mount. I’m not specifically using in in the current online training but turned it on for the photos to look good 😉
Check out some of our courses here. If you’d like to discuss any training (Online or Face-to-Face) please get in touch.